Not all bolt tightening sequences are created equal.
Bolted flange joint assemblers have been using the Star Pattern since Taylor Forge started standardizing on flanges in 1938.
The sequence has been used for pipe flanges on both ASME B16.5 and ASME B16.47 flanges (NPS 26 inch and above), heat exchangers, and other applications like butterfly valves.
You’ll see the Star Pattern applied to all types of gasket materials and flange types, including Raised Face (RF), Ring Type Joint (RTJ), Double-Jacketed, Spiral Wound Gaskets, and even newer gasket types like the Kammprofile gasket.
While the Star Pattern is the most common, it is certainly not the only — or necessarily the best — bolting pattern to apply when torquing a bolted flange assembly.
In fact, there is no “silver bullet” bolt tightening sequence ideal for torquing every type of flange or gasket. The gasket type, and arrangement of the flange connection, are both critical to choosing which tightening sequence an assembler can use.
This article, which is intended for supervisors, engineers, or anyone else who oversees bolted flange assembly or maintenance, will discuss different torque sequences. Along the way, we’ll offer guidance about which methods are best for achieving desired final torque values with minimum bolt scatter, and ensuring your gasket isn’t damaged in the process.
To keep the scope of this article reasonable, we won’t address other important elements of bolt tightening procedures like flange alignment, gasket installation, torque values, torque tables, how bolt torque needs to change for different materials (like stainless steel bolts), and so on. Those topics are covered in depth in lessons included our free online training.
What bolt tightening sequences are covered in ASME PCC-1?
ASME PCC-1 is probably the world’s leading guideline covering the assembly of bolted flange joints.
In the publication’s 2010 edition, ASME PCC-1 published an entire appendix (Appendix F) dedicated to bolt tightening sequences, including the Star Pattern (which it labeled the “Legacy Pattern” because the technique has been around so long) and several other options, which were classified as “Alternative” bolting patterns.
These alternative bolting sequences were included to demonstrate more efficient ways to assemble flange connections. Like the star pattern, the alternative approaches could be used with just about any tightening method from hydraulic torque to pneumatic torque to manual torquing with a clicker wrench.
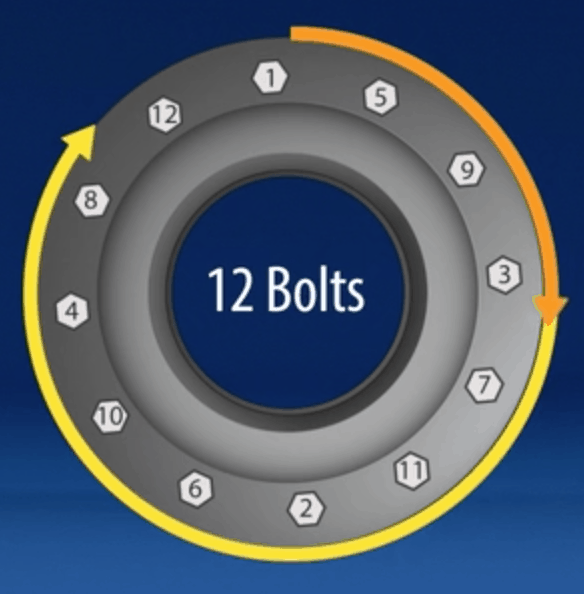
Legacy (a.k.a. “Star”) Bolting Pattern
As we mentioned earlier, this is the most common of all bolt tightening sequences used on flanged connections. The pattern is well understood around the globe, and its use has stood the test of time.
How to Perform the Star Pattern
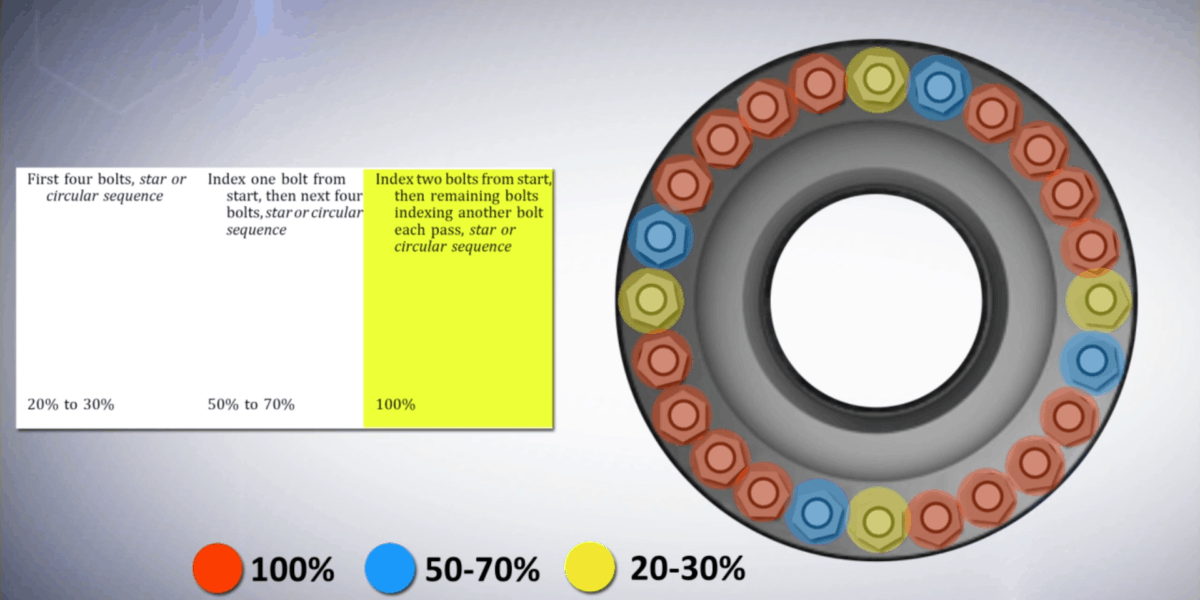
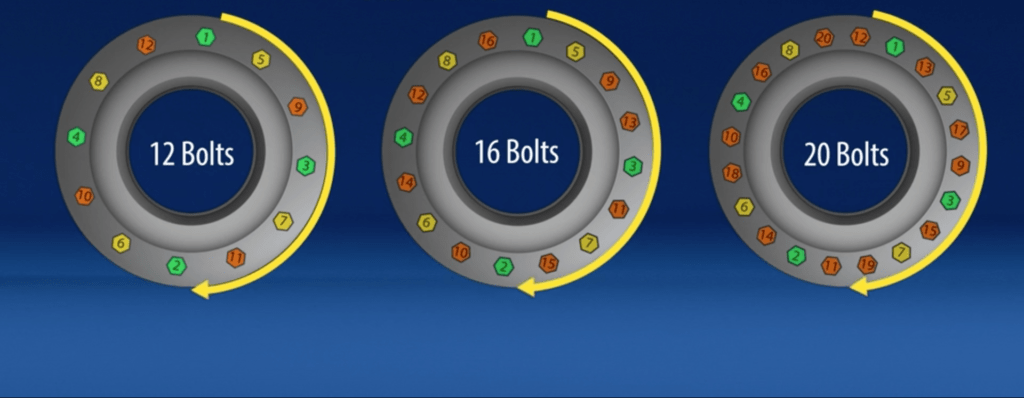
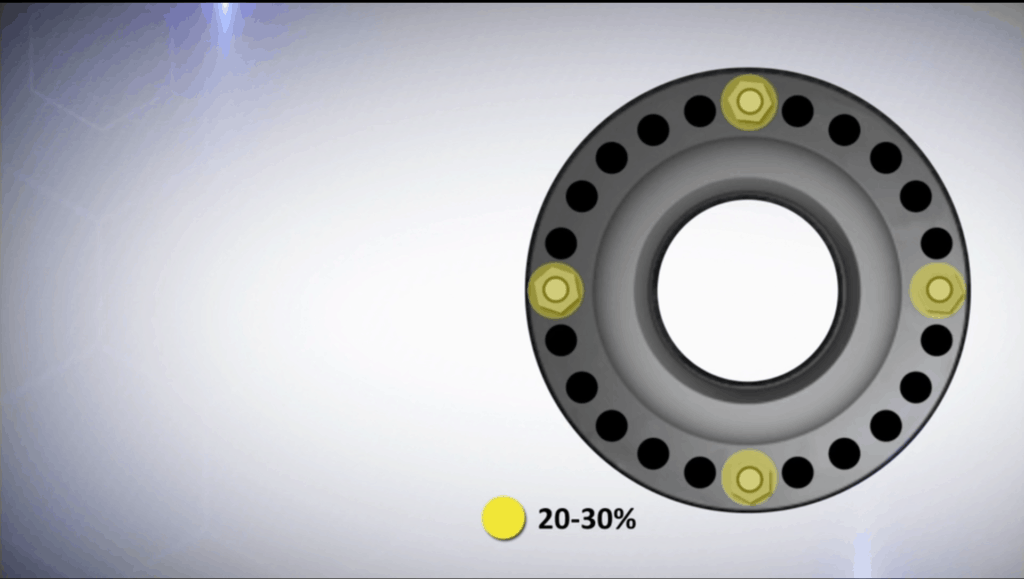
The first thing you do is tighten each flange bolt between 20% and 30% of your target ft-lbs in the star pattern. The pattern itself is to apply to bolts #1-4 below (in order):
…then move to bolts 5-8, again, applying torque in order:
…and to complete this first step, you apply to bolts 9-12:
Now you have approximately 20-30% on all 12 bolts in this example flange. There will be variations due to elastic interaction, but that’s about the average.
Step #2 is to follow the same star pattern while applying 50% to 70% of the target ft-lbs.
Then the third part of this tightening sequence is to set your wrench at 100% of required torque (ft-lbs) and apply to all bolts while again following the same star pattern.
The final step is to apply rotational or “circular” passes.
You’ll typically go around the flange twice with the wrench set on your final torque value, but the goal is to go until the nuts stop moving.
Normally, with spiral wound gaskets or Kammprofile gaskets, this takes about two circular passes, but with RTJ gaskets you’ll need to perform additional ringer passes.
Restrictions: None. The star bolting pattern is good for use on all ASME B16.5, B16.47, and heat exchanger flanges. It’s also valid on all flange face and gasket types, including RTJ gaskets.
Recommendations: The drawback to the Star pattern is time. This bolting pattern is not as efficient as the alternatives, and can be very time consuming when you are working on flanges with 20 or more bolts. But if most of the flanges on your site are ASME B16.5 flanges sized 12” or smaller, you might want to stick with the Star Pattern and not implement other bolting patterns to avoid confusion with the assemblers.
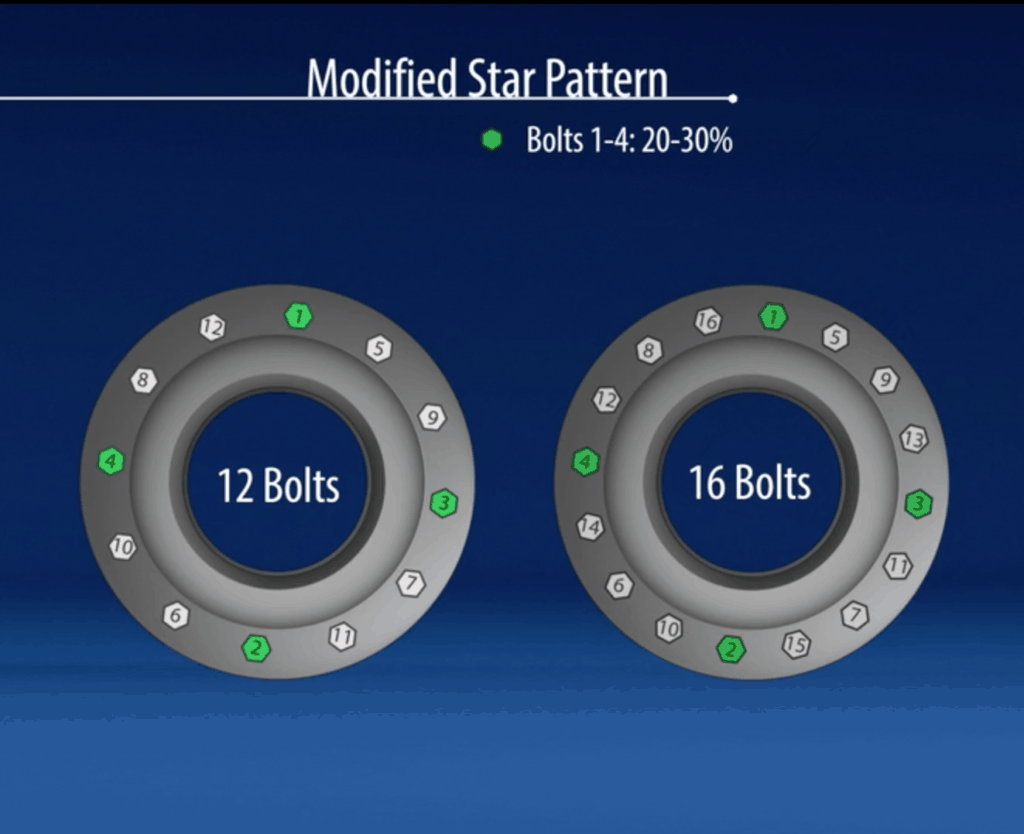
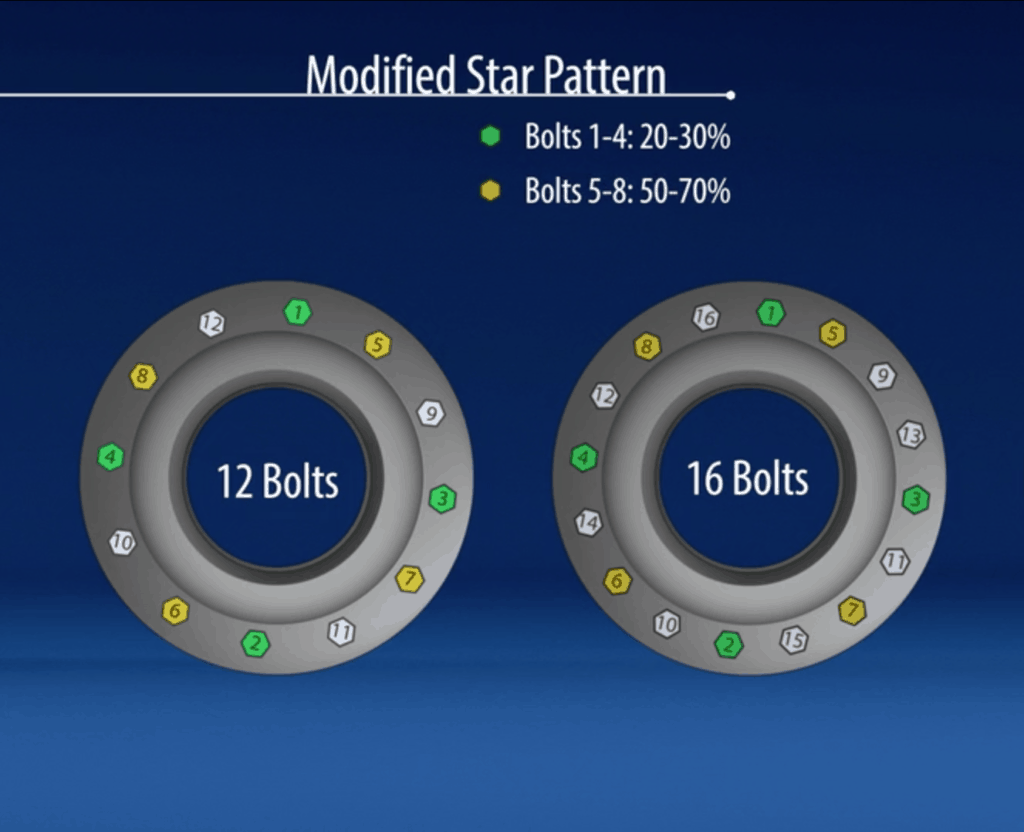
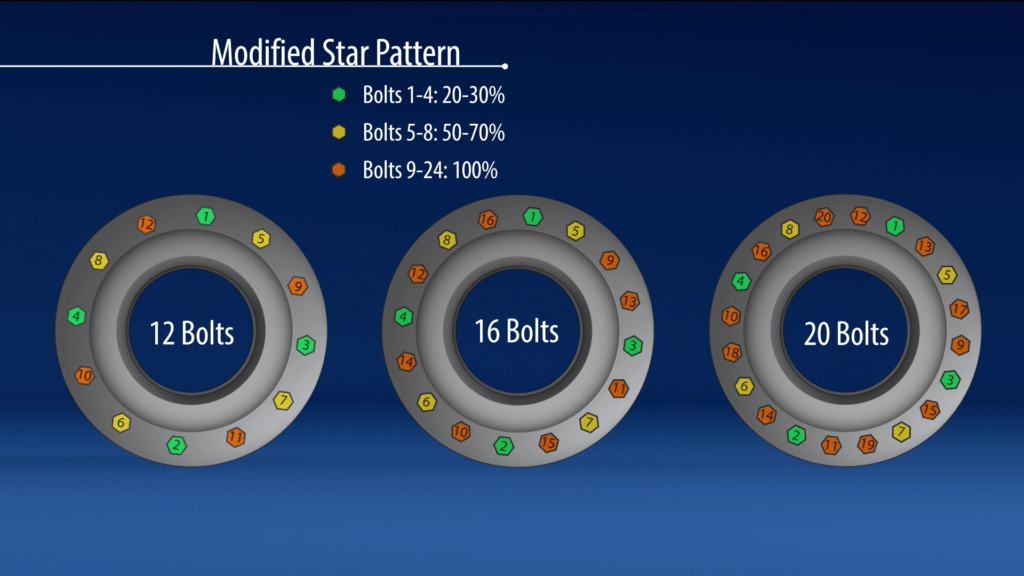
Modified Star Bolting Pattern
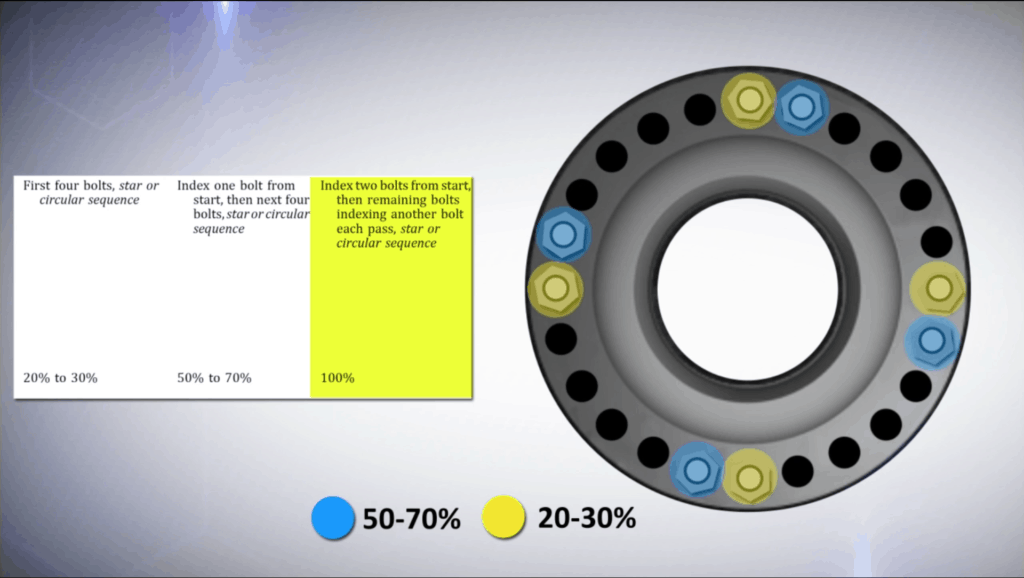
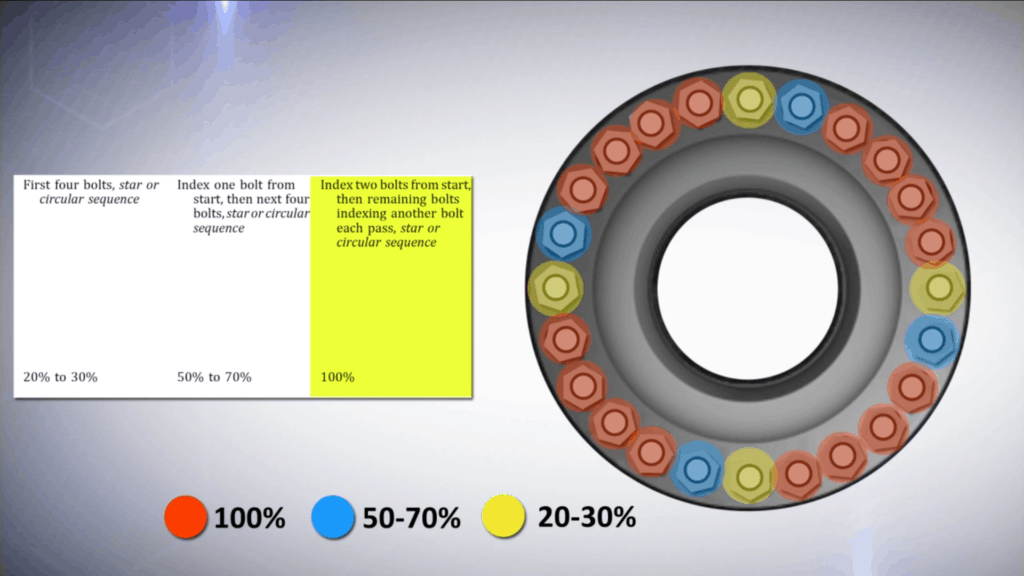
PCC-1 refers to the Modified Star as “Alternative Assembly Pattern #1,” and this bolt tightening sequence follows the same tightening pattern as the Star. What’s different is how preload levels on the fasteners preload increase more rapidly with this approach.
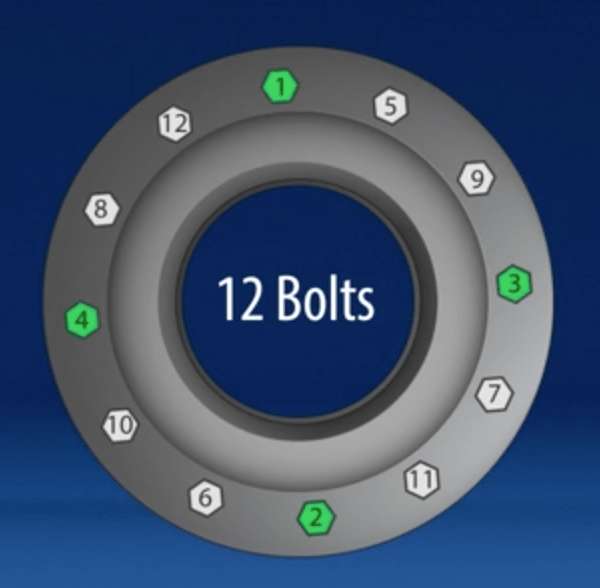
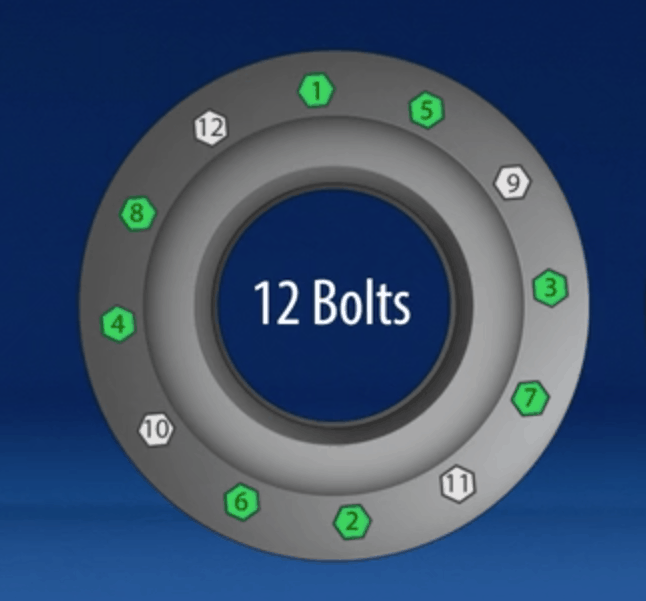
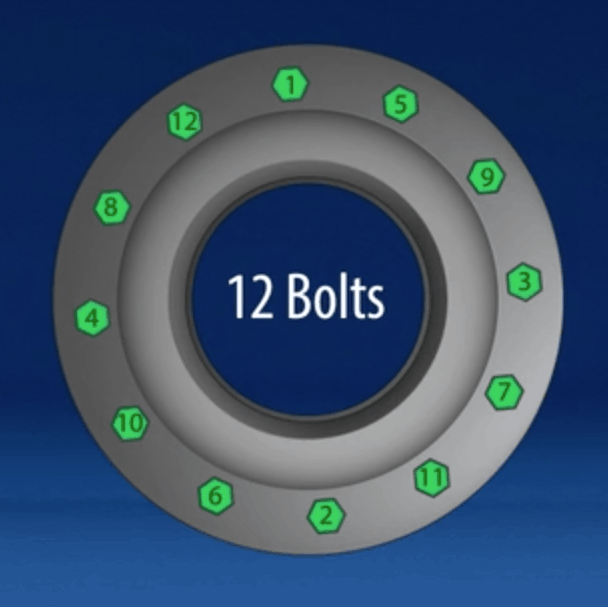
If you look at the diagrams below, you will see you how the assembler tightens flange bolts in the same order, but increases bolt load after just the first four bolts.
In fact, you can break down that first pass into three parts:
- Pass 1A – Tighten the first four stud bolts to between 20% and 30% of your target ft-lbs.
- Pass 1B – Tighten the next four bolts in the Star Pattern to between 50% and 70% of the target ft-lbs.
- Pass 1C – Tighten the rest of the bolts in a star Pattern to 100% of your final torque.
- Pass 2 – ASME PCC-1 states that soft gaskets (see ASME PCC-1 Appendix B for definitions on hard gaskets and soft gaskets) such as spiral wound and double jacketed gaskets must have a full star pattern completed. However, Kammprofile gaskets do not need Pass 2.
- Pass 3+ – The final series of passes are rotational passes, where you go around the flange in a circle with your wrench set at the final torque value. Once again, you’ll go until the nuts stop moving. Normally, with spiral wound gaskets and Kammprofile gaskets, we see that this takes about two circular passes. RTJ gaskets require additional final passes.
The modified star’s approach means you’re able to perform fewer total tightening sequences, which in turn means less time and effort required since there are fewer total bolt touches overall.
Restrictions: None. Like the Star Pattern, the Modified Star is good for all ASME B16.5, B16.47, and heat exchanger flanges, and will cover all flange face and gasket types.
Recommendations: The Modified Star bolting pattern is much more time-efficient than the Star Pattern, especially when you are working on flanges with 20 or more bolts. The Modified Star can be helpful on some 16-bolt flanges, especially if they involve larger-sized studs (1-inch diameter or greater). You won’t be saving a significant amount of time with the Modified Star on flanges with 12 bolts or less.
There is a learning curve for the Modified Star bolting pattern, but it’s fairly easy for most assemblers to overcome since the only change is the gradual step up in torque values during your first pass.
Quadrant Pattern
The Quadrant Pattern, or “Alternative Assembly Pattern #3,” is more efficient than both the Star Pattern and Modified Star Pattern. With the Quadrant Pattern, fastener preload levels increase rapidly within the first tightening sequence.
You also don’t have to “criss-cross” the flange as much, which saves even more time. An added bonus is that experienced assemblers won’t need to number the flange when they are applying this pattern — so long as they were trained well.
The diagram below shows how the torque wrench moves only one bolt over after you have made your first “star sequence.”
You’ll also increase your bolt load settings after tightening your first four bolts. The diagrams below show how you will…
- Pass 1A – Tighten the first four stud bolts to between 20% and 30% of your target ft-lbs.
- Pass 1B – Tighten the next four bolts, placing each to the right of the already tightened bolts, to between 50% and 70% of the target ft-lbs.
- Pass 1C – Tighten the rest of the bolts in the pattern to 100% of your final torque. You’ll continue applying torque on the bolt immediately to the right of the previously tightened bolt, following the pattern while working all the way around the flange.
- Pass 2 – For any gasket other than a Kammprofile, you’ll need to repeat this pattern a second time. Kammprofile gaskets do not need Pass 2.
- Pass 3+ – The final passes are rotational (i.e., “circular” or “ringer”) passes, where you set the wrench to your final torque value and go around the flange until the nuts stop moving. Normally, with spiral wound gaskets and Kammprofile gaskets, we see that this takes about two circular passes, but RTJ gaskets will need additional final passes.
Restrictions: None. This bolting pattern is good for all ASME B16.5 & B16.47, and heat exchanger flanges. It will also cover all flange face and gasket types including RTJ gaskets.
Recommendations: This bolting pattern is much more time-efficient than the Star & Modified Star Pattern when you have flanges with 20 or more bolts. The learning curve for this bolting pattern is fairly low, however, if your craft personnel aren’t assembling many flanges, you might want to stick with the Modified Star sequence.
Circular Pattern
While PCC-1 covers the use of the Circular Pattern, Hex Technology does not recommend the bolting pattern for the average assembler. The Circular Pattern can only be used with hard gaskets such as Kammprofile gaskets, and can not be used on spiral wounds, RTJs, or double-jacketed gaskets.
For that reason, we’ll leave the how-to for this pattern out of this article. If the pattern is in use at your site, you need assistance with it or wish to know more, please contact our service line at [email protected].
Other helpful guides for bolt tightening:
Guide to Manual Torque Wrenches
How to Lubricate Flange Components
Join Industry Leaders!
Subscribe to Hex Technology today and we’ll give you $700 in bolting courses, FREE. Your path to a safer, more reliable, more profitable site starts here.